Learn to create a Spring boot web application using Spring Intializr interface and with Maven or Gradle.
1. Pre-requisites
We can create the web application using Spring Initializr, download and import it into an IDE such as Eclipse. We will need the following to get started:
- A favorite text editor or IDE
- JDK 1.8 or later
- Gradle 4+ or Maven 3.2+
Alternatively, we can directly create the web application in the following IDEs using the Maven quickstart archetype.
2. Generated Artifacts
Let us assume we are creating the project using Spring Initializr using Maven to import dependencies and build the project.
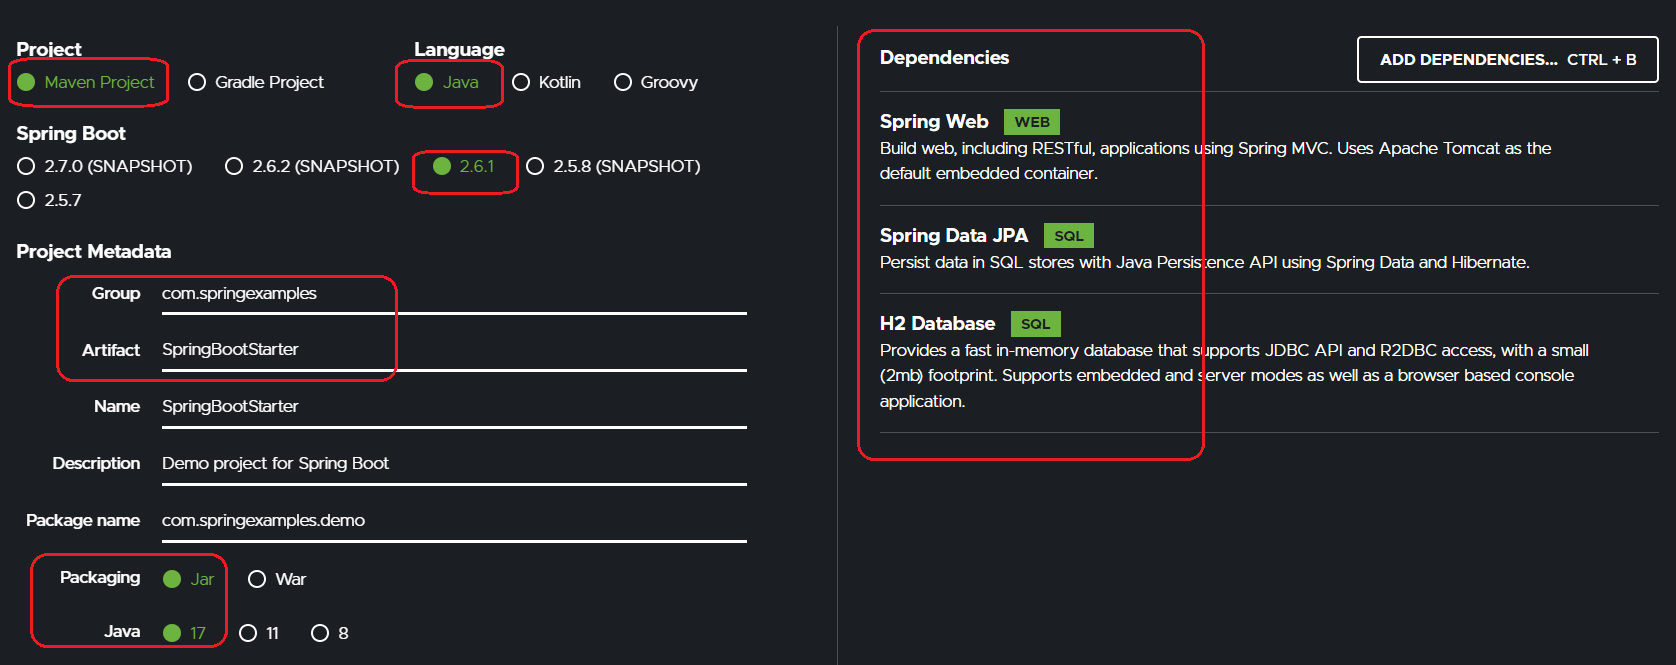
2.1. Dependencies
The generated project’s parent is spring-boot-starter-parent.
<parent>
	<groupId>org.springframework.boot</groupId>
	<artifactId>spring-boot-starter-parent</artifactId>
	<version>${spring-boot-version}</version>
	<relativePath/> <!-- lookup parent from repository -->
</parent>
The pom.xml also contains the modules we imported. Each project has spring-boot-starter-test imported automatically.
<dependency>
	<groupId>org.springframework.boot</groupId>
	<artifactId>spring-boot-starter-data-jpa</artifactId>
</dependency>
<dependency>
	<groupId>org.springframework.boot</groupId>
	<artifactId>spring-boot-starter-web</artifactId>
</dependency>
<dependency>
	<groupId>com.h2database</groupId>
	<artifactId>h2</artifactId>
	<scope>runtime</scope>
</dependency>
<dependency>
	<groupId>org.springframework.boot</groupId>
	<artifactId>spring-boot-starter-test</artifactId>
	<scope>test</scope>
</dependency>
2.2. Application Bootstrap Class and Test Class
The generated project source code also contains two Java files.
The first file is used to run the application with an embedded Tomcat server. This contains one of the essential annotations i.e., @SpringBootApplication. This annotation is a combination of three annotations:
- @Configuration
- @EnableAutoConfiguration
- @ComponentScan
@SpringBootApplication
public class SpringBootStarterApplication {

    public static void main(String[] args) {
        SpringApplication.run(SpringBootStarterApplication.class, args);
    }

}
The second file is for writing the JUnit tests.
import org.junit.jupiter.api.Test;
import org.springframework.boot.test.context.SpringBootTest;

@SpringBootTest
class SpringBootStarterApplicationTests {

    @Test
    void contextLoads() {
    }

}
3. Hello World Mapping
The default-created application does not have any URL handler, so all the URLs will return 404 status. We need to create a URL mapping and its handler to test the application.
Create a class HelloWorldController and provide a method to handle root URL.
import org.springframework.web.bind.annotation.GetMapping;
import org.springframework.web.bind.annotation.RestController;

@RestController
public class HelloWorldController {

    @GetMapping("/")
    public String hello() {
        return "Hello World !!";
    }
}
4. Running the Application
To run the application, run the main() method in the class SpringBootStarterApplication. This will start the embedded tomcat server and deploy the application into it.
By default, the application starts at port 8080 and the default context path is ‘/‘.

5. Customize the Defaults
There are some sensible defaults we can change to start customizing this application. Each configuration item can be changed using a property in application.properties file.
There is a long list of spring boot properties, we can customize.
server.port=8081   #Server port number

server.servlet.context-path=myapp   #Context path of the application
6. Conclusion
In this tutorial, we learned to create a spring boot application from scratch. Though we can create the application in the IDEs too, using the Spring Intializr interface is very much convenient.
The source code of the examples here is over on GitHub.