REST (REpresentational State Transfer) is an architectural style for building next-generation APIs. Spring Boot provides excellent support for building REST APIs by hiding most complexities under the auto-configurations.
This Spring Boot REST tutorial aims to provide a high-level overview of the infrastructure that Spring framework provides for building functional and mature REST APIs.
1. Overview
We will build a user management module using which clients can list all users, create and update users, and also delete users by their id.
This tutorial will start with the basics and then start discussing advanced stuff for building production class APIs. We do not intend to cover every topic in-depth to focus on covering all the building blocks and how to start with them.
After finishing this tutorial, we will have a better understanding of how to REST APIs using Spring boot annotations, request validation support, building hateoas links and returning custom response codes.
We will not cover more advanced topics like API security and pagination, which will be discussed in separate posts.
2. Dependencies
Spring boot aims at simplifying Spring application bootstrapping by providing a set of starter project templates. For building REST APIs, we will be creating a Spring Boot WebMVC application. To make a meaningful functionality, we will need the following modules in the project.
- spring-boot-starter-web: Starter for building web, including RESTful, applications using Spring MVC. Uses Tomcat as the default embedded container.
- spring-boot-starter-hateoas: Starter for building hypermedia-based RESTful web application with Spring MVC and Spring HATEOAS.
- spring-boot-starter-validation: Starter for using Java Bean Validation with Hibernate Bean Validator.
- springfox-boot-starter: For documenting the APIs using Swagger.
- spring-boot-starter-data-jpa and h2: Starter for using Spring Data JPA with Hibernate. H2 is an embedded database for which Spring boot supports auto-configuration.
- spring-boot-starter-test: Starter for testing Spring Boot applications with libraries including JUnit Jupiter, Hamcrest and Mockito.
- spring-boot-devtools and lombok: To enable automatic server reboots. Lombok helps in minimizing the bolilerplate code.
<parent>
	<groupId>org.springframework.boot</groupId>
	<artifactId>spring-boot-starter-parent</artifactId>
	<version>${spring-boot-version}</version>
	<relativePath /> <!-- lookup parent from repository -->
</parent>

<dependency>
	<groupId>org.springframework.boot</groupId>
	<artifactId>spring-boot-starter-web</artifactId>
</dependency>
<dependency>
	<groupId>org.springframework.boot</groupId>
	<artifactId>spring-boot-starter-data-jpa</artifactId>
</dependency>
<dependency>
	<groupId>org.springframework.boot</groupId>
	<artifactId>spring-boot-starter-hateoas</artifactId>
</dependency>
<dependency>
	<groupId>org.springframework.boot</groupId>
	<artifactId>spring-boot-starter-validation</artifactId>
</dependency>
<dependency>
	<groupId>com.h2database</groupId>
	<artifactId>h2</artifactId>
	<scope>runtime</scope>
</dependency>
<dependency>
	<groupId>org.projectlombok</groupId>
	<artifactId>lombok</artifactId>
	<scope>provided</scope>
</dependency>
<dependency>
	<groupId>org.springframework.boot</groupId>
	<artifactId>spring-boot-devtools</artifactId>
</dependency>
<dependency>
	<groupId>io.springfox</groupId>
	<artifactId>springfox-boot-starter</artifactId>
	<version>3.0.0</version>
</dependency>
<dependency>
	<groupId>org.projectlombok</groupId>
	<artifactId>lombok</artifactId>
	<scope>provided</scope>
</dependency>
<dependency>
	<groupId>org.springframework.boot</groupId>
	<artifactId>spring-boot-starter-test</artifactId>
	<scope>test</scope>
</dependency>
3. Designing Building REST APIs
3.1. Core Annotations
For writing the resource handler methods, we will be using the following annotations:
@RestController– A composed annotation that is combination of @Controller and @ResponseBody. It marks the controllers that follow the @ResponseBody semantics by default.@RequestMapping– mapping HTTP requests onto controller methods. This annotation can be used both at the class and at the method level.@ResponseBody– indicates a method return value should be bound to the web response body (e.g. JSON or XML response).@GetMapping– annotation for mapping HTTP GET requests onto specific handler methods. It is a shortcut for writing @RequestMapping(method = RequestMethod.GET).@PostMapping– annotation for mapping HTTP POST requests onto specific handler methods. Shortcut for writing @RequestMapping(method = RequestMethod.POST).@PutMapping– annotation for mapping HTTP PUT requests onto specific handler methods. Shortcut for writing @RequestMapping(method = RequestMethod.PUT).@DeleteMapping– annotation for mapping HTTP DELETE requests onto specific handler methods. Shortcut for writing @RequestMapping(method = RequestMethod.DELETE).
There will be other annotations too for writing specific supporting functionalities that we will see later.
3.2. Identifying REST Resources and Verbs
Discussing all the nitty-gritty of REST is out of the scope of this guide. We will focus on only what we are building here.
Our intended module is User management, and the primary entity is user. To keep things simple, a user will have only four attributes id, firstName, lastName and email.
@Entity
@Table(name = "TBL_USERS")
@Data
@NoArgsConstructor
@AllArgsConstructor
@Relation(collectionRelation = "users", itemRelation = "user")
public class User {

  private @Id @GeneratedValue Long id;

  @Column(name = "first_name")
  private String firstName;

  @Column(name = "last_name")
  private String lastName;

  private String email;
}
The user entity can have two representations:
users: user collection resourceuser: single user resource
If we follow the REST principles, both resource representations will support the HTTP GET method. A user can be created only inside a collection of resources, and updates and deletes should be supported by singular resources.
Let’s list down the URLs for which we will be creating the handler methods.
HTTP GET    /users
HTTP POST /users

HTTP GET   /users/{id}
HTTP PUT   /users/{id}
HTTP DELETE /users/{id}
3.3. REST Controller Class
Start with writing the controller class which will have the resource handler methods. Annotate the class with @RestController annotation because all the handler methods will be returning the JSON responses.
Also, note that all of our handler mapping URLs start with ‘/users‘. We can add this information at the class level and it will be automatically added to all handler methods.
The controller will have the reference to other beans for specific purposes such as DAO.
@RestController
@RequestMapping("/users")
public class UserResourceController {

  @Autowired
  private UserRepository repository;
}
3.4. Fetching the Resources
To fetch the resources, we need to write the HTTP GET APIs and we will use @GetMapping annotation. The annotation value will be the HTTP URL that it will handle. The complete URL will be obtained after combining the class level @RequestMapping value i.e. /users and the value specified in @GetMapping annotation.
According to Roy Fielding, a REST API must have HATEOAS links. Without hateoas, an API is just RPC.
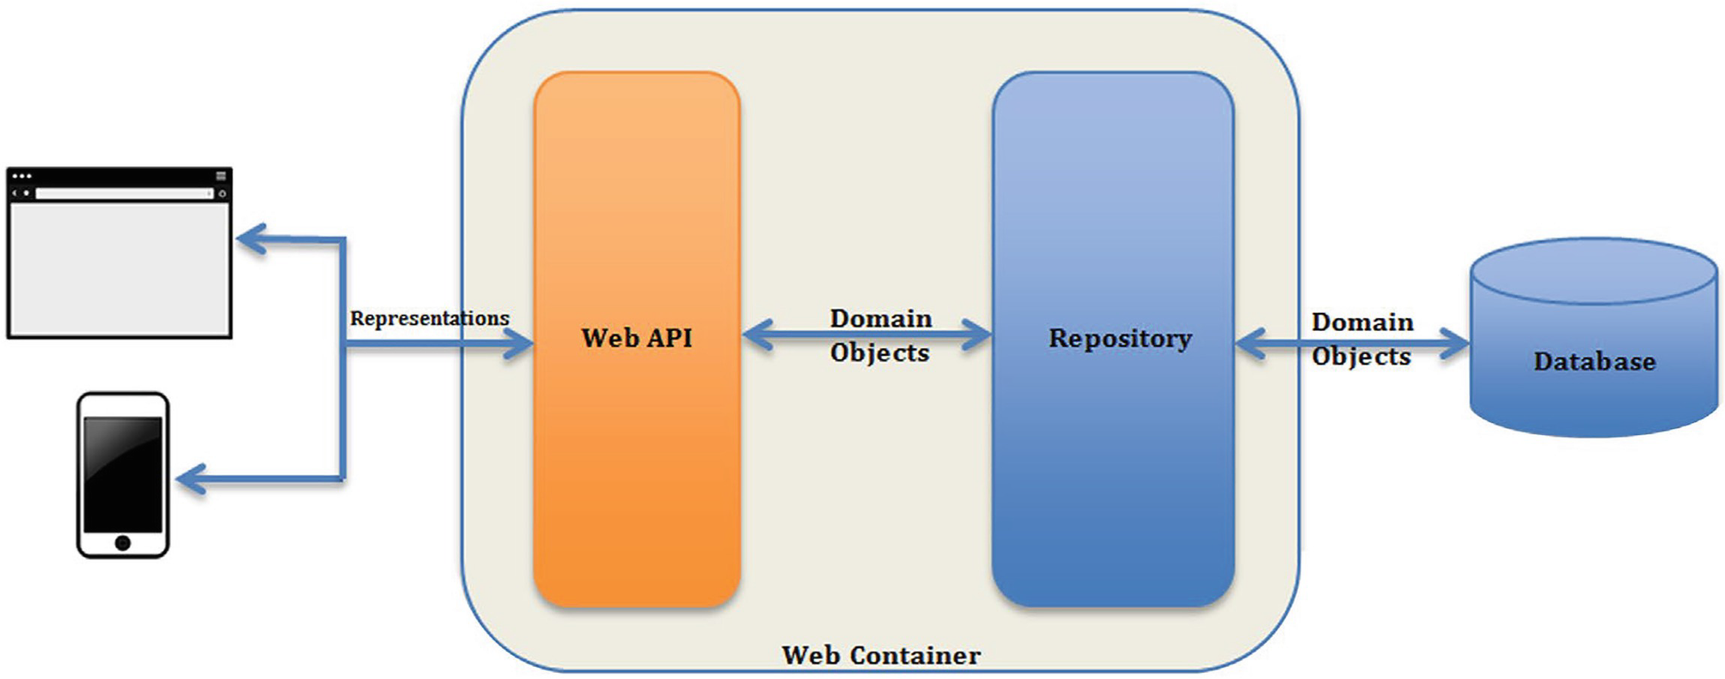
The CollectionModel and EntityModel are used for wrapping the domain objects and adding links to them. A detailed discussion on HATEOAS is out of the scope of this post.
The GET /users API fetches all users from the repository, build the links and return CollectionModel. In case, there are no users in the system, an empty collection will be returned.
@GetMapping
public CollectionModel<EntityModel<User>> getAll() {
	List<EntityModel<User>> users = repository.findAll()
	  .stream()
	  .map(assembler::toModel)
	  .collect(Collectors.toList());

	return CollectionModel.of(users,
	  linkTo(methodOn(UserResourceController.class).getAll()).withSelfRel());
}
The GET /users/{id} API fetches a user by id. It then builds the links and returns EntityModel. In case, there is no user for the given id in the system, RecordNotFoundException error is thrown.
@GetMapping("/{id}")
public EntityModel<User> getById(@PathVariable Long id) {

	User user = repository.findById(id)
	  .orElseThrow(() -> new RecordNotFoundException(id));

	return assembler.toModel(user);
}
public class RecordNotFoundException extends RuntimeException {
private static final long serialVersionUID = 1L;
public RecordNotFoundException(Long id) {
super("Record not found for id : " + id);
}
}3.5. Creating a New Resource
To create a new user, we will post the user details to the users collection URL. We need to write HTTP POST API with the help of @PostMapping annotation.
After the resource has been created, HTTP status 201 CREATED will be returned along with the link to the newly created resource.
@PostMapping
public ResponseEntity<?> create(@RequestBody User newUser) {
	User createdUser = repository.save(newUser);

	EntityModel<User> userModel = assembler
	  .toModel(repository.save(createdUser));

	return ResponseEntity
	  .created(userModel.getRequiredLink(IanaLinkRelations.SELF)
	    .toUri())
	  .body(userModel);
}
3.6. Updating an Existing Resource
To update an existing resource, we will write HTTP PUT API with the help of @PutMapping annotation. In the method, we search the database by id.
- If an existing user is found by id, user details are updated.
- If the user is NOT found, a new user is created.
@PutMapping("/{id}")
public EntityModel<User> update(@RequestBody User newUser, @PathVariable Long id) {

	User updatedUser = repository.findById(id)
	  .map(user -> {
	    user.setFirstName(newUser.getFirstName());
	    user.setLastName(newUser.getLastName());
	    user.setEmail(newUser.getEmail());
	    return repository.save(newUser);
	  })
	  .orElseGet(() -> { newUser.setId(id); return repository.save(newUser); });

	EntityModel<User> entityModel = assembler.toModel(updatedUser);

	return entityModel;
}
3.7. Deleting a Resource
Deleting the resource is rather simple. We delete the user from the database and return status 204 NO_CONTENT. As the resource has been deleted from the server, no response body is sent.
@DeleteMapping("/{id}")
public ResponseEntity<?> delete(@PathVariable Long id) {
	repository.deleteById(id);
	return ResponseEntity.noContent().build();
}
4. Exception Handling
Notice the getById() method where we are throwing RecordNotFoundException when a user is not found by its id. There can be many more such use cases where we search a resource in the system and it is not found for any reason.
It totally makes sense to handle all such scenarios in a single place so we can alter this common logic in a single place if needed in the future.
Since these exceptions are generally thrown from the controller, we can use @ControllerAdvice to create a global exception handler.
@ControllerAdvice
public class GlobalExceptionHandler {

  @ResponseBody
  @ExceptionHandler(RecordNotFoundException.class)
  @ResponseStatus(HttpStatus.NOT_FOUND)
  String recordNotFoundHandler(RecordNotFoundException ex) {
    return ex.getMessage();
  }
}
5. Request Body Validation
The PUT and POST APIs accept request payloads for creating and updating the resource representations on the server. Before sending these payloads, it makes sense to validate these payloads for basic null checks and formatting validations.
Though UI clients also do few basic validations before sending requests to the server, the APIs should not rely on the clients for the validation. APIs should properly validate the requests before sending to DAO layer.
The spring-boot-starter-validation dependency auto-configures the hibernate validator beans in the application. We only need to add suitable annotations in the POJO objects and @RequestBody parameters.
For example, we are making sure that when a user is created in the system, its first name, last name and email must be populated in the request.
public class User {

  private @Id @GeneratedValue Long id;

  @NotBlank(message = "First name is mandatory")
  @Column(name = "first_name")
  private String firstName;

  @NotBlank(message = "Last name is mandatory")
  @Column(name = "last_name")

  @NotBlank(message = "Email is mandatory")
  private String lastName;

  private String email;
}
To trigger the validation on request submission, we must add @Valid annotation along with @RequestBody on the request parameters.
@PostMapping
public ResponseEntity<?> create(@Valid @RequestBody User newUser) {
	//
}

@PutMapping("/{id}")
public EntityModel<User> update(@Valid @RequestBody User newUser, @PathVariable Long id) {
	//
}
Note that when the User object is not valid then the validator will throw MethodArgumentNotValidException which we must catch, parse and prepare appropriate error message to send to the client. Generally, this kind of error handling is done in our GlobalExceptionHandler.
@ControllerAdvice
public class GlobalExceptionHandler {

  @ResponseStatus(HttpStatus.BAD_REQUEST)
  @ExceptionHandler(MethodArgumentNotValidException.class)
  public Map<String, String> handleValidationExceptions(
    MethodArgumentNotValidException ex) {
      Map<String, String> errors = new HashMap<>();
      ex.getBindingResult().getAllErrors().forEach((error) -> {
          String fieldName = ((FieldError) error).getField();
          String errorMessage = error.getDefaultMessage();
          errors.put(fieldName, errorMessage);
      });
      return errors;
  }
}
6. API Documentation
A REST API should have solid documentation to enable developers to use it effectively. There are various tools in the market for this purpose. One of such tools is Swagger.
Swagger is a specification and a framework for creating interactive REST API documentation. It enables documentation to be in sync with any changes made to REST services. It also provides a set of tools and SDK generators for generating API client code.
To integrate swagger, simply include its dependency in the project and start using its annotations which provide information to swagger about the APIs.
To discuss swagger documentation is out of scope, so let us quickly see how it looks like. Swagger internally reads a lot of things in the code to provide documentation for them. We need to provide the missing information.
Once we start the application, we can see the swagger documentation in URL: http://localhost:8080/swagger-ui/
@RestController
@RequestMapping("/users")
@ApiResponses(value = {
    @io.swagger.annotations.ApiResponse(code = 400,
    	message = "This is a bad request, please follow the API documentation for the proper request format"),
    @io.swagger.annotations.ApiResponse(code = 401,
    	message = "Due to security constraints, your access request cannot be authorized"),
    @io.swagger.annotations.ApiResponse(code = 500,
    	message = "The server is down. Please bear with us."), })
public class UserResourceController {
	//
}
To get the Swagger generated resource listings, we can access them in JSON format in the URL: http://localhost:8080/v3/api-docs.
There is a known issue in the new versions of swagger with Spring boot. To fix it, define this property in application.properties file.
spring.mvc.pathmatch.matching-strategy=ant-path-matcherAlso, if by mistake if you have included springfox-swagger-ui dependency in the project then you may get error java.io.FileNotFoundException: class path resource [springfox/documentation/spring/web/SpringfoxWebConfiguration.class] during server start. Remove the dependency to fix this issue.
7. Conclusion
In this Spring boot REST API tutorial, we for a very high level of overview of the infrastructure provided by the Spring framework and boot auto-configurations. We learned to create APIs, handle errors, validate request bodies and create API documentation.
There are many more advanced topics such as those listed below and we will cover these topics in detail in other posts.
- Response Caching
- Response Compression
- Content Negotiation
- HATEOAS
- API Versioning
- API Security
- API Documentation
- Request Validation
- Error Handling
- Testing
- Logging
You can check out the source code of these examples over Github.